Mosaic Jelly Recipe with Only 4 Ingredients
Introduction
Mosaic jelly is one of those desserts that instantly brings joy to the table. With its colorful cubes suspended in creamy jelly, it looks festive, elegant, and surprisingly fancy—yet it is incredibly easy to make. This dessert is loved by kids and adults alike because of its playful appearance, soft texture, and refreshing taste. The best part? You only need four simple ingredients to create this stunning dessert.
In many South Asian households, mosaic jelly is a popular choice for birthdays, Eid gatherings, family get‑togethers, and summer parties. It is affordable, beginner‑friendly, and can be prepared ahead of time, making it perfect for busy hosts. Despite its beautiful look, it does not require baking, special equipment, or advanced cooking skills.
This detailed guide will walk you through everything you need to know to make a perfect mosaic jelly using just four ingredients. From preparation tips and step‑by‑step directions to variations, serving ideas, storage tips, and common mistakes—this article covers it all in depth. By the end, you’ll feel confident enough to make this dessert flawlessly every single time.
What Is Mosaic Jelly?
Mosaic jelly—also known as broken glass jelly, stained glass jelly, or rainbow jelly—is a layered or mixed dessert made by combining colorful jelly cubes with a creamy base. The jelly cubes resemble pieces of stained glass or a mosaic pattern, which is where the dessert gets its name.
The base is usually made with milk, cream, or condensed milk, giving it a soft, creamy texture that balances the sweetness and firmness of the jelly cubes. When sliced, each piece reveals a beautiful pattern of colors, making it visually appealing without any extra decoration.
Why This 4‑Ingredient Mosaic Jelly Recipe Works
Many mosaic jelly recipes include long ingredient lists with cream, sugar, gelatin, evaporated milk, and flavorings. While those versions are delicious, they can feel overwhelming—especially for beginners.
This recipe simplifies everything while keeping the taste and presentation impressive. With only four ingredients:
• It’s budget‑friendly
• It’s quick to prepare
• It’s perfect for beginners
• It’s easy to customize
You don’t need fancy tools or cooking techniques. If you can boil water and cut jelly into cubes, you can make this dessert.
Ingredients (Only 4!)
1. Flavored Jelly (Any Colors) – 3 Packs
You can use any brand of jelly available locally. Choose at least three different colors for the best mosaic effect. Common choices include:
• Strawberry (red)
• Lemon or pineapple (yellow)
• Orange (orange)
• Lime (green)
• Blue raspberry (blue)
Using different colors is essential for achieving that signature mosaic look.
2. Milk – 2 Cups
Use full‑cream milk for the richest and creamiest texture. Low‑fat milk can work, but the final result may be less smooth.
3. Condensed Milk – 1 Cup
Condensed milk adds sweetness and creaminess to the dessert. It also helps bind the jelly cubes together beautifully.
4. Plain Gelatin Powder – 2 Tablespoons
Unflavored gelatin is the setting agent for the creamy base. It ensures that the dessert holds its shape when sliced.
Equipment You’ll Need
• Saucepan
• Mixing bowls
• Whisk or spoon
• Knife
• Jelly mold or rectangular dish
• Measuring cups and spoons
No blender or oven required.
Step‑by‑Step Directions
Step 1: Prepare the Colored Jelly
Start by preparing each pack of flavored jelly separately according to the instructions on the package. Usually, this involves dissolving the jelly powder in hot water.
Pour each flavor into a separate shallow dish or bowl. Shallow dishes help the jelly set evenly and make it easier to cut into cubes later.
Allow the jelly to cool at room temperature, then place it in the refrigerator for 2–3 hours or until completely set.
Important Tip: Do not mix the colors together. Each flavor must set separately.
Step 2: Cut the Jelly into Cubes
Once the jelly is fully set, remove it from the refrigerator. Using a sharp knife, cut each jelly into small cubes—approximately 1 to 1.5 cm in size.
Try to keep the cubes roughly the same size for a neat and balanced mosaic appearance.
Gently separate the cubes and combine all the different colors in a large bowl. Handle them carefully to avoid breaking.
Step 3: Prepare the Creamy Base
In a small bowl, add the plain gelatin powder to ½ cup of cold milk. Let it sit for 5–10 minutes to bloom. This step is crucial for smooth gelatin without lumps.
Meanwhile, heat the remaining milk in a saucepan over low heat. Do not boil.
Add the condensed milk and stir continuously until fully combined.
Now add the bloomed gelatin mixture to the warm milk and stir until the gelatin is completely dissolved. Remove from heat.
Allow the mixture to cool slightly. It should be warm, not hot.
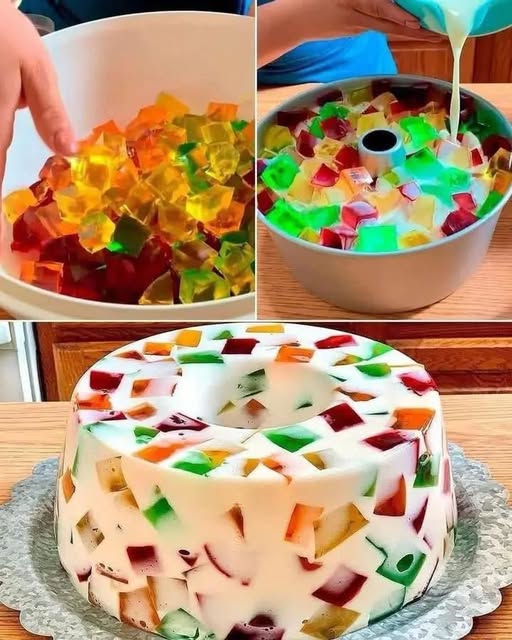
Step 4: Assemble the Mosaic Jelly
Grease your mold or dish lightly with oil or rinse it with water (do not dry it). This helps in easy removal later.
Add the mixed jelly cubes evenly into the mold.
Slowly pour the creamy milk mixture over the jelly cubes. Use a spoon to gently press the cubes down so they are evenly distributed.
Tap the mold lightly on the counter to remove air bubbles.
Step 5: Chill and Set
Cover the mold with plastic wrap or foil.
Place it in the refrigerator for at least 4–6 hours, or overnight for best results.
Once fully set, run a knife around the edges and gently unmold onto a serving plate.
Slice and serve chilled.
Texture and Taste Description
The final dessert has a soft, creamy base that melts in your mouth, paired with firm, fruity jelly cubes that provide a pleasant bite. Each spoonful delivers a mix of flavors and textures—sweet, milky, and refreshing all at once.
Common Mistakes to Avoid
• Pouring hot milk mixture over jelly cubes (can melt them)
• Not blooming gelatin properly
• Using too much gelatin (rubbery texture)
• Skipping chilling time
Variations You Can Try
Coconut Mosaic Jelly
Replace half of the milk with coconut milk for a tropical flavor.
Fruit Mosaic Jelly
Add chopped fruits like mango or strawberries along with jelly cubes.
Layered Mosaic Jelly
Create layers by letting each layer set before adding the next.
Serving Ideas
• Serve with fresh fruit on the side
• Garnish with mint leaves
• Drizzle with chocolate or strawberry sauce
• Serve in individual cups for parties
Storage Instructions
Store mosaic jelly covered in the refrigerator for up to 3–4 days. Do not freeze, as freezing affects texture.
Why Kids Love This Dessert
• Bright colors
• Fun texture
• Sweet but not heavy
• Looks like candy
Frequently Asked Questions
Can I use agar‑agar instead of gelatin?
Yes, but the texture will be firmer and slightly different.
Can I make this ahead of time?
Absolutely. It’s even better when made a day in advance.
Is this dessert halal?
Yes, as long as halal‑certified gelatin is used.
Final Thoughts
This 4‑ingredient mosaic jelly recipe proves that you don’t need complicated ingredients or advanced skills to create a show‑stopping dessert. It is simple, colorful, creamy, and endlessly customizable. Whether you’re making it for a family dinner, celebration, or just to satisfy a sweet craving, this dessert never disappoints.
Once you try it, mosaic jelly will quickly become one of your go‑to no‑bake desserts. Simple ingredients, stunning presentation, and guaranteed smiles—what more could you ask for?
Happy cooking!